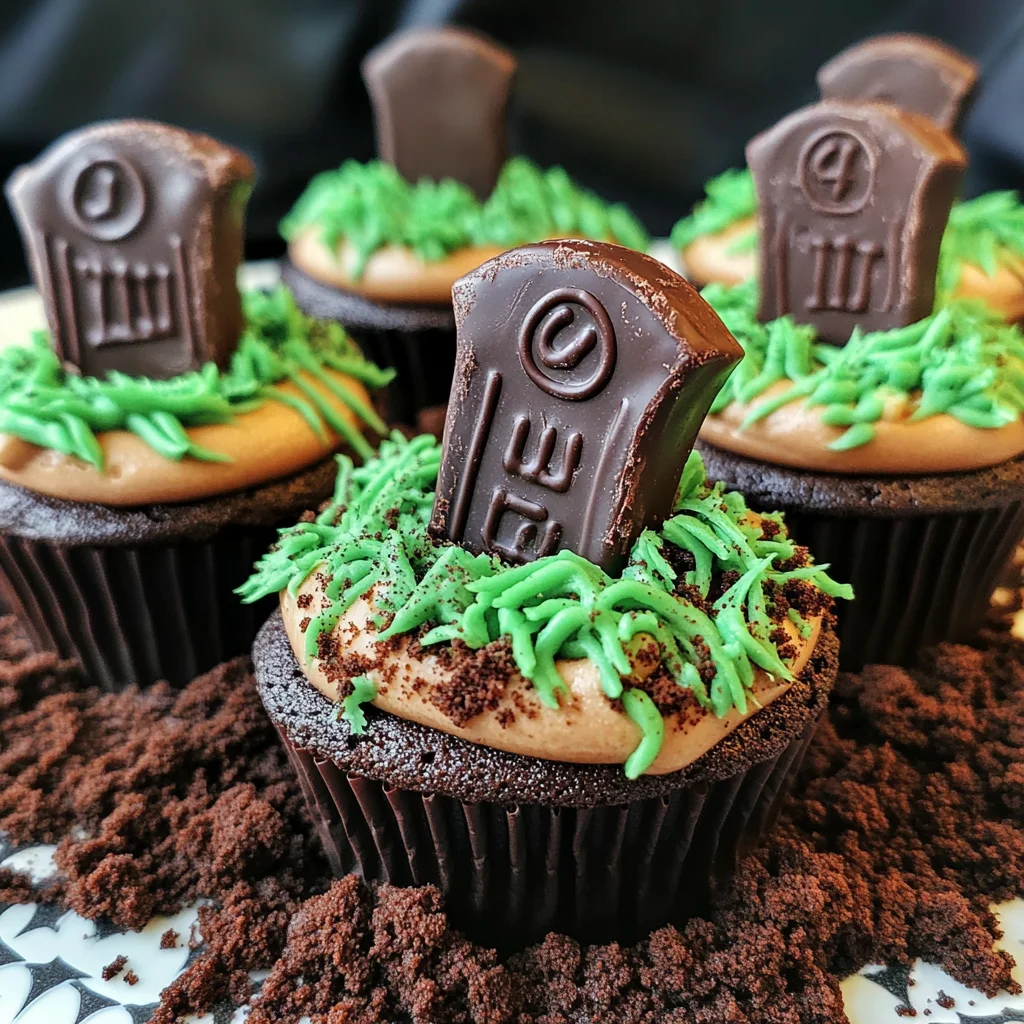
Halloween Graveyard Cupcakes
Chocolate cupcakes made to look like a graveyard, these Halloween Graveyard Cupcakes are perfect for your spooky celebrations! With an Oreo cheesecake filling, rich chocolate buttercream, and fun decoration, they will impress guests of all ages. These delightful treats not only bring festive flair to your Halloween gatherings but also satisfy every sweet tooth with their delicious flavors and textures.
Why You’ll Love This Recipe
- Eye-catching Presentation: These cupcakes resemble spooky graves, making them an exciting centerpiece for any Halloween event.
- Deliciously Decadent: The combination of chocolate, cream cheese, and Oreo brings a satisfying blend of flavors that everyone will love.
- Fun Activity: Decorating the cupcakes can be a fun activity for kids and adults alike, perfect for family gatherings or parties.
- Versatile Treat: While ideal for Halloween, these cupcakes can also be enjoyed year-round for any celebration or gathering.
- Easy to Make: With simple steps and common ingredients, this recipe is straightforward enough for bakers of all skill levels.
Tools and Preparation
Before diving into the baking process, gather your essential tools. Having everything ready makes it easier to follow the recipe without interruption.
Essential Tools and Equipment
- Cupcake tin
- Cupcake cases
- Electric whisk or stand mixer
- Piping bags
- Palette knife
- Mixing bowls
Importance of Each Tool
- Cupcake tin: Helps shape your cupcakes evenly for consistent baking.
- Electric whisk or stand mixer: Saves time and ensures thorough mixing for a fluffy cupcake texture.
- Piping bags: Ideal for decorating your cupcakes with precision and creativity.

Ingredients
For the Cupcakes
- 12 Lotus biscoff biscuits
- 150 g Dark chocolate (melted)
- 175 g Baking spread or butter (softened, unsalted)
- 175 g Caster sugar
- 3 Eggs (large)
- 2 tbsp Milk
- 150 g Self raising flour
- 25 g Cocoa powder
- 1/4 tsp Baking powder
For the Oreo Cheesecake Filling
- 115 g Full fat cream cheese
- 15 g Icing sugar
- 15 g Oreos (crushed)
- 1/8 tsp Vanilla extract
For the Chocolate Buttercream
- 100 g Butter (softened, unsalted)
- 165 g Icing sugar
- 35 g Cocoa powder
- 1-2 tsp Milk
For the Green Grass Buttercream
- 25 g Butter (softened, unsalted)
- 50 g Icing sugar
- 1/8 tsp Vanilla extract
- Green food colouring
- 35 g Oreos (crushed)
How to Make Halloween Graveyard Cupcakes
Step 1: Prepare the Biscuit Graves
- Start by snapping about a third off each biscuit to create gravestones that fit nicely on top of your cupcakes.
- Melt the dark chocolate in a microwave or double boiler. Dip each biscuit into the melted chocolate and place them on baking paper to set.
Step 2: Create Fun Designs with White Chocolate
- Once the dark chocolate has set on the biscuits, melt the white chocolate.
- Transfer it into a piping bag and pipe fun designs on top of each biscuit gravestone. Let them set again.
Step 3: Bake the Cupcakes
- Preheat your oven to 140C Fan/160C/325F/Gas Mark 3 and line your cupcake tin with cupcake cases.
- In a mixing bowl, combine the baking spread and caster sugar using an electric whisk until light and fluffy (about 5 minutes).
- Add in the eggs and milk, mixing well until fully combined.
- Gently fold in self raising flour, cocoa powder, and baking powder until just incorporated.
- Divide this mixture evenly among the cupcake cases.
- Bake in preheated oven for 25–30 minutes or until a skewer inserted comes out clean. Allow cooling completely once baked.
Step 4: Make Oreo Cheesecake Filling
- While cupcakes cool, prepare the Oreo cheesecake filling by mixing cream cheese, icing sugar, and vanilla extract until smooth.
- Stir in crushed Oreos gently until combined.
Step 5: Fill Cupcakes with Cheesecake Mixture
- Using a cupcake corer or knife, make a hole in the center of each cooled cupcake.
- Fill each hole with cheesecake mixture using either a spoon or piping bag.
Step 6: Prepare Chocolate Buttercream
- In another bowl, mix softened butter with cocoa powder and icing sugar until smooth.
- Add milk gradually until you achieve desired consistency.
Step 7: Prepare Green Grass Buttercream
- Combine softened butter with icing sugar in a separate bowl.
- Mix in vanilla extract and green food coloring until you get your desired shade of green.
Step 8: Decorate Your Cupcakes
- Pipe chocolate buttercream onto each cupcake using a round nozzle; smooth out with a palette knife if desired.
- Insert one chocolate-covered biscuit gravestone into each cupcake.
- Sprinkle crushed Oreos around the base of each biscuit to resemble soil.
- Use green buttercream to pipe grass around each gravestone or create texture with small blobs using a spoon.
Step 9: Enjoy!
Store any leftovers in an airtight container in a cool place and enjoy within three days!
Now you have delightful Halloween Graveyard Cupcakes that are sure to be the talk of any party!
How to Serve Halloween Graveyard Cupcakes
Halloween Graveyard Cupcakes are perfect for spooky celebrations and gatherings. They not only look fantastic but also taste delicious. Here are some creative serving suggestions to make your dessert table even more festive.
Display in a Coffin
- Arrange the cupcakes in a decorative coffin-shaped container for a dramatic effect that enhances the Halloween theme.
Use Spooky Toppers
- Add edible decorations like candy eyeballs or ghost-shaped sprinkles on top of the cupcakes to give them an extra frightful flair.
Pair with Halloween Drinks
- Serve alongside themed drinks, such as pumpkin spice lattes or spooky fruit punch, to create a complete Halloween experience.
Create a Dessert Table
- Set up a dessert table featuring various Halloween-themed treats, including cookies, candies, and other cupcakes to complement the graveyard theme.
Individual Cupcake Boxes
- Place each cupcake in a small box for guests to take home. This adds a personal touch and makes for great party favors.
Include Themed Plates and Napkins
- Use plates and napkins decorated with ghosts, bats, or pumpkins to enhance the overall presentation of your Halloween spread.
How to Perfect Halloween Graveyard Cupcakes
To ensure your Halloween Graveyard Cupcakes turn out perfect every time, consider these helpful tips.
- Use Room Temperature Ingredients: Ensure butter, eggs, and cream cheese are at room temperature for better mixing and texture.
- Don’t Overmix the Batter: Mix until just combined to keep your cupcakes light and fluffy; overmixing can lead to dense cupcakes.
- Cool Completely Before Decorating: Allow your cupcakes to cool entirely before adding frosting and toppings. This prevents melting and ensures clean designs.
- Experiment with Colors: Feel free to play around with different food coloring shades for the grass buttercream to create unique effects.
- Store Properly: Keep leftover cupcakes in an airtight container in a cool place. Enjoy them within three days for freshness.
Best Side Dishes for Halloween Graveyard Cupcakes
Serving side dishes alongside your Halloween Graveyard Cupcakes can elevate your spooky celebration. Here are some great options:
- Pumpkin Soup: A warm and comforting soup that complements the fall flavors of Halloween.
- Stuffed Peppers: Fill bell peppers with rice and vegetables; decorate them like jack-o’-lanterns for added fun.
- Spooky Veggie Platter: Arrange vegetables in ghost or spider shapes; serve with hummus or ranch dip.
- Cheesy Spider Bread: Bake bread shaped like spiders with gooey cheese filling; it’s both creepy and delicious!
- Witch’s Brew Stew: A hearty vegetable stew served with crusty bread can warm up your guests on chilly October nights.
- Ghostly Guacamole Dip: Shape guacamole into ghost figures using sour cream eyes; serve with tortilla chips for a festive crunch.
- Caramel Apple Slices: Sweet apple slices coated in caramel make for an easy-to-eat treat that pairs well with chocolate flavors.
- Mummy Hot Dogs: Wrap hot dogs in crescent dough strips to resemble mummies; bake until golden brown for a fun finger food option.
Common Mistakes to Avoid
When making Halloween Graveyard Cupcakes, it’s essential to keep in mind some common mistakes that could affect the final results.
- Skipping the cooling time: Allowing the cupcakes to cool completely before decorating is crucial. If you frost them too early, the icing will melt and ruin your design.
- Not measuring ingredients accurately: Precision is key in baking. Using incorrect measurements can lead to dense or overly dry cupcakes. Use a kitchen scale for accuracy.
- Overmixing the batter: Mixing too much after adding flour can create tough cupcakes. Mix until just combined for a lighter texture.
- Ignoring oven temperature: Always preheat your oven properly. An incorrect temperature can cause uneven baking, leading to cupcakes that are either undercooked or overbaked.
- Using stale ingredients: Fresh ingredients make a significant difference in taste. Check expiration dates, especially for baking powder and cocoa powder.
- Neglecting decoration details: The fun of Halloween Graveyard Cupcakes is in their spooky appearance. Take your time with decorations like crushed Oreos and biscuit gravestones for maximum effect.
Storage & Reheating Instructions
Refrigerator Storage
- Store the cupcakes in an airtight container.
- They will last up to 3 days in the refrigerator.
Freezing Halloween Graveyard Cupcakes
- Wrap each cupcake individually in plastic wrap.
- Place them in a freezer-safe container or bag; they can be frozen for up to 2 months.
Reheating Halloween Graveyard Cupcakes
- Oven: Preheat to 160°C (320°F) and warm for about 10 minutes. This helps maintain texture.
- Microwave: Heat on low power for about 15-20 seconds. Be careful not to overheat as it may dry them out.
- Stovetop: Not recommended as it may alter the cupcake’s texture significantly.
Frequently Asked Questions
Here are some common questions about making Halloween Graveyard Cupcakes:
Can I use different fillings for my Halloween Graveyard Cupcakes?
Absolutely! You can experiment with various fillings like fruit curds, whipped cream, or even flavored creams to match your style.
How do I make my cupcakes more moist?
To enhance moisture, ensure you don’t overbake them and consider adding an extra tablespoon of milk or using buttermilk instead of regular milk.
What if I don’t have green food coloring?
You can use natural alternatives like spinach powder or matcha for a green hue, or simply decorate with other colors that fit your theme!
How long do these cupcakes last?
Halloween Graveyard Cupcakes can be stored in the refrigerator for up to 3 days and frozen for up to 2 months when properly wrapped.
Can I make these cupcakes ahead of time?
Yes! You can bake the cupcakes and prepare the fillings ahead of time. Just assemble them on the day you plan to serve them for best results.
Final Thoughts
These Halloween Graveyard Cupcakes are not only visually stunning but also deliciously rich with chocolate flavors and creamy fillings. Perfect for gatherings or spooky celebrations, feel free to customize them with your favorite toppings or fillings. Enjoy crafting this delightful treat that is sure to impress both kids and adults alike!
Halloween Graveyard Cupcakes

Halloween Graveyard Cupcakes are a delightful fusion of spooky aesthetics and scrumptious flavors, making them the perfect treat for your Halloween celebrations. These playful cupcakes feature a rich chocolate cake base filled with creamy Oreo cheesecake and topped with luscious chocolate buttercream. The fun doesn’t stop there—each cupcake is adorned with chocolate-covered biscuit gravestones and a sprinkling of crushed Oreos to mimic soil, creating an enticing graveyard scene that’s sure to impress guests of all ages. Whether you’re hosting a party or looking for a festive dessert to enjoy, these cupcakes will be the highlight of any gathering!
- Prep Time: 30 minutes
- Cook Time: 30 minutes
- Total Time: 1 hour
- Yield: Makes approximately 12 servings 1x
- Category: Dessert
- Method: Baking
- Cuisine: American
Ingredients
- 12 Lotus biscoff biscuits
- 150 g Dark chocolate (melted)
- 175 g Baking spread or butter (softened, unsalted)
- 175 g Caster sugar
- 3 Eggs (large)
- 2 tbsp Milk
- 150 g Self raising flour
- 25 g Cocoa powder
- 1/4 tsp Baking powder
- 115 g Full fat cream cheese
- 15 g Icing sugar
- 15 g Oreos (crushed)
- 1/8 tsp Vanilla extract
- 100 g Butter (softened, unsalted)
- 165 g Icing sugar
- 35 g Cocoa powder
- 1–2 tsp Milk
- 25 g Butter (softened, unsalted)
- 50 g Icing sugar
- 1/8 tsp Vanilla extract
- Green food colouring
- 35 g Oreos (crushed)
Instructions
- Prepare gravestones by snapping biscoff biscuits and dipping them in melted dark chocolate.
- Preheat your oven and mix baking spread and caster sugar until fluffy. Add eggs and milk, then fold in dry ingredients.
- Bake the cupcakes until a skewer comes out clean, then cool completely.
- Make the Oreo cheesecake filling and fill each cupcake.
- Create chocolate buttercream and green grass buttercream for decorating.
- Pipe frosting onto cupcakes before adding gravestones and crushed Oreos.
Nutrition
- Serving Size: 1 cupcake (100g)
- Calories: 450
- Sugar: 35g
- Sodium: 210mg
- Fat: 22g
- Saturated Fat: 10g
- Unsaturated Fat: 12g
- Trans Fat: 0g
- Carbohydrates: 59g
- Fiber: 2g
- Protein: 4g
- Cholesterol: 80mg